
Introduction to Helix
Helix is the screen your controllers and planners work from. It shows your whole operation in real time — who is where, what work is waiting, and the schedule Spiral has built — and lets you watch, adjust and commit that schedule as the day unfolds. This guide explains the main parts of the screen and the ideas behind them.
(To install and configure Helix, see Getting started; for the architecture behind it, see the Helix technical overview.)
The dispatch screen
Section titled “The dispatch screen”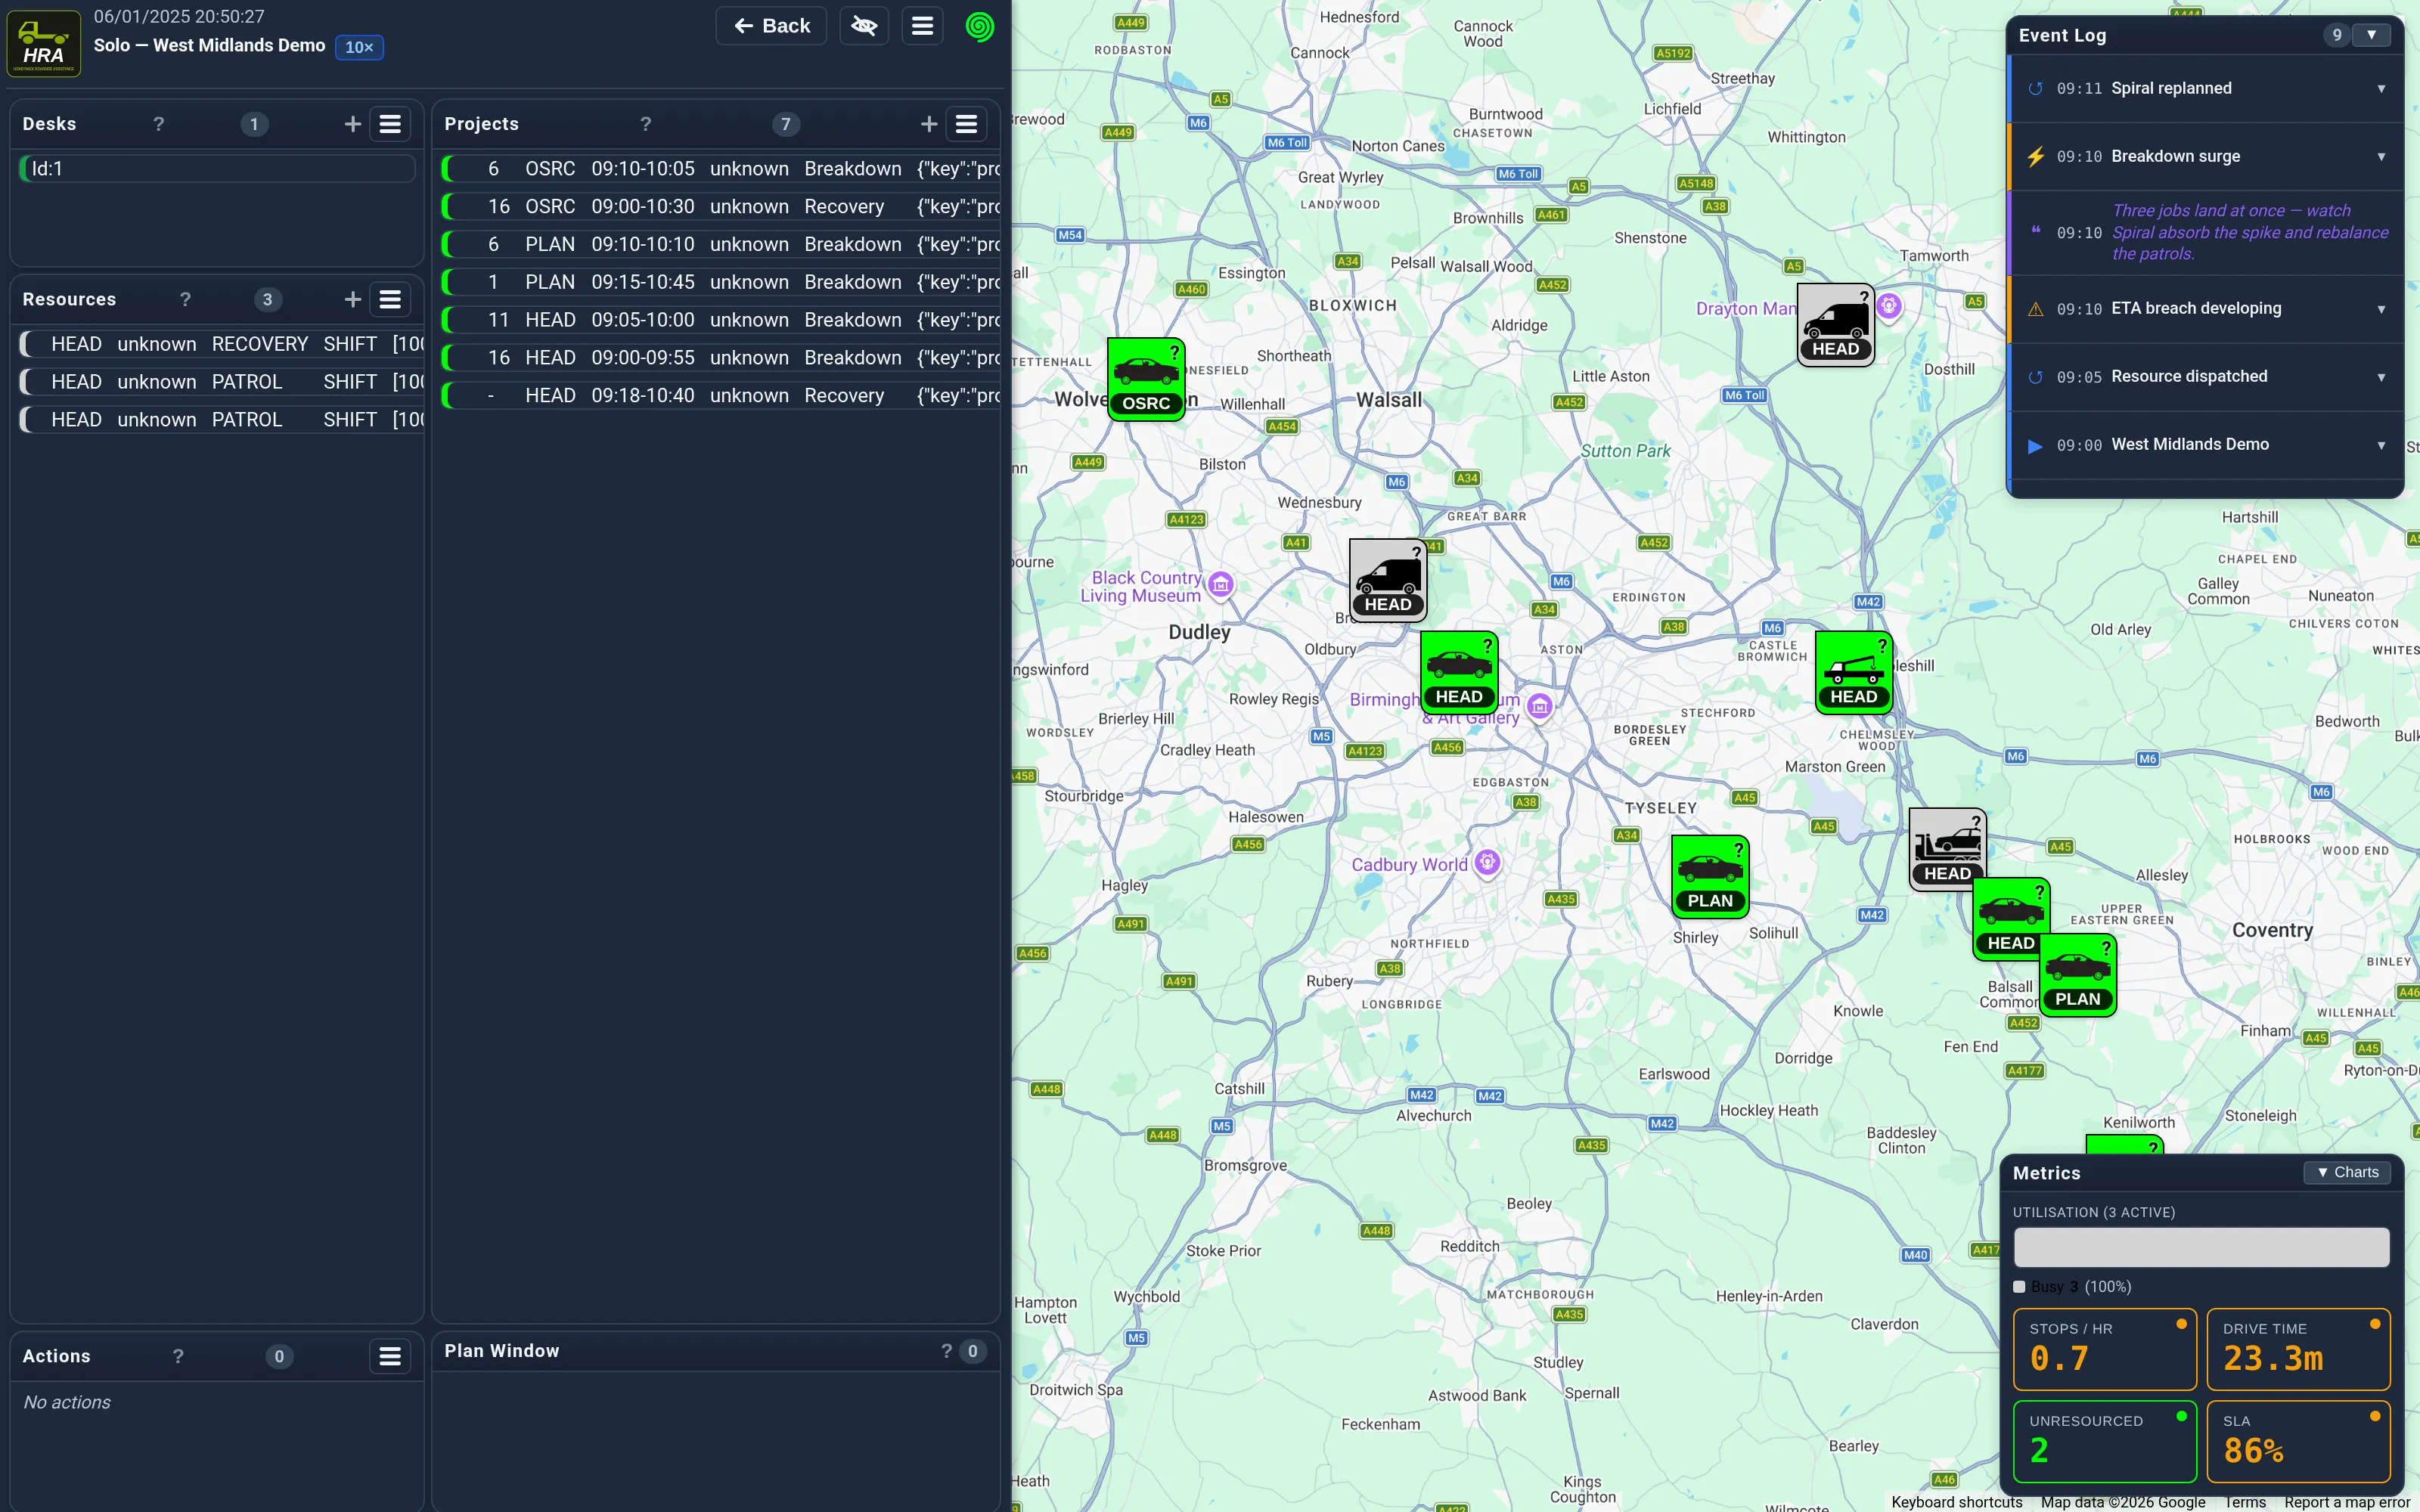
The screen is two columns beside a live map:
- Left column — your Desks, the Resources they cover, and the Actions queue.
- Right column — the work lists (Projects and Response points) and the Plan window.
- Map — the same information laid out geographically.
Everything is live: as Spiral re-optimises, the lists, the map and the plan update together — there is no nightly batch and no re-keying.
A desk is a slice of the operation — a region, a skill, a contract — that groups the work and the resources you care about. You engage a desk at three levels:
- Hide (none) — not engaged; its work isn’t shown.
- Watch (green) — you’re watching it: its work and resources stream in and appear on the map and in the lists. Watching a desk filters the view to what that desk manages.
- Own (red) — you’re actively managing it. Owned desks sort to the top of the lists so the work you own stays together.
Click a desk row to reveal its Own · Watch · Hide toggle and set the level; a coloured bar down the left of the row shows its state (red owned, green watched). Double-click opens the desk’s full settings. When you select a job, the desk currently managing it is highlighted too, so you can see at a glance who owns a piece of work.
A desk’s settings include an Earliest window: work is only allocated to the desk when it lies at least that far in the future, keeping a forward-planning desk (say, next-day booking) clear of today’s jobs. It is set as days + hours (type a value or use the steppers — hours roll over into days), and defaults to 0 (no restriction). The optimiser treats it as a preference: sooner than leave a job without a desk, it will bend the rule and allocate anyway.
Desk sets — one pool, viewed by horizon
Section titled “Desk sets — one pool, viewed by horizon”Give two desks the same name and they become a set: one resource pool sliced by how far out the work lies. Members differ only by their Earliest window, and each shows it in its title:
PRIMARY GARAGING <- no window: covers the nearer workPRIMARY GARAGING 2#00:00:00 <- 2 days aheadPRIMARY GARAGING 7#00:00:00 <- a week aheadYou do not build a set by hand. Set an Earliest window on a desk that had none and Helix offers to add a second desk for the forward work — that is the set. Note which one ends up with the window: the desk you edited keeps covering the nearer work, and the new one takes the window you typed. That is deliberate — the desk you were already using holds today’s jobs and your own/watch setting, and moving it to a future horizon would take both with it.
Clear the window on a member and Helix offers to remove that band, re-allocating its work across what remains. A set always keeps exactly one member with no window; the rest hold distinct windows, and a window another member already covers is refused.
Everything except the window is shared: change a skill, a rank, the livery or the name on any member and every member follows, so the pool stays one pool. A rename renames the whole set.
Open any member and the editor shows the whole set — a row of its windows with the one you are editing picked out, and a note that every setting below is shared. Click another window to switch to that member (you are asked first if you have unsaved changes). That way you always see the pool you are about to change, not just the one band you happened to open.
What is not shared is how you engage them. Each member has its own Own · Watch · Hide, so you can watch next week while owning today, and the work lists and map filter to whichever bands you have engaged. Spiral decides which member ends up owning a given job — the set simply gives it, and you, the horizons to work with.
No desk means no desk. With nothing watched or owned, no desk-scoped work streams to the screen — only unassigned work (and the desk list itself, so there is always something to pick from). Engage desks to bring their work in. In a live operation your watched/owned desks are remembered per login and restored when you return; in demonstrations every desk starts watched automatically, so the whole scenario is visible from the first moment. Desks (and surge zones) can also be created and configured before a demonstration starts — they no longer wait for the schedule to begin.
A surge zone raises an alert level (RED / AMBER / GREEN) for a domain over an area of the map: the surge-zone editor sets the domain, the alert level and the zone’s reach. The alert re-weights how the affected work and resources are scheduled inside the zone; the effects themselves are configured per work type by the client. See the surgeZone reference.
Resources
Section titled “Resources”A resource is a person or vehicle that does the work — a patrol, an engineer, a recovery truck. Each
resource has a home base, skills, a roster (when it is on shift, at base or resting) and a
live position. Its row shows its current status (see Stop states), and it appears on the
map at its location. The list is ordered by how much attention a resource needs: a called-out standby
(CALL, dark blue) sorts to the very top, working and deploying resources follow, idle resources after
them, and waiting standbys (STBY, light blue) after the idles.
Opening a resource in the resource editor you can adjust:
- Skills — the capabilities it provides. When the client defines skill domains the editor groups skills by domain (Police / Ambulance / Fire, Road / Home, …) and offers only the master-list skills, with the right control per skill (a toggle, a capacity, or a limit); otherwise it is a free-form list.
- Location and base — each has a 🔍 search that finds an address or area on the map. The current location is owned by the live position stream, so when you set no override the field shows where the resource actually is now; type an override only to move it explicitly.
- Dedicated activities — breaks and other non-productive stops the resource must fit in. A resource starts with none; use Add dedicated activity to author one rather than being given an empty placeholder.
Projects and stops
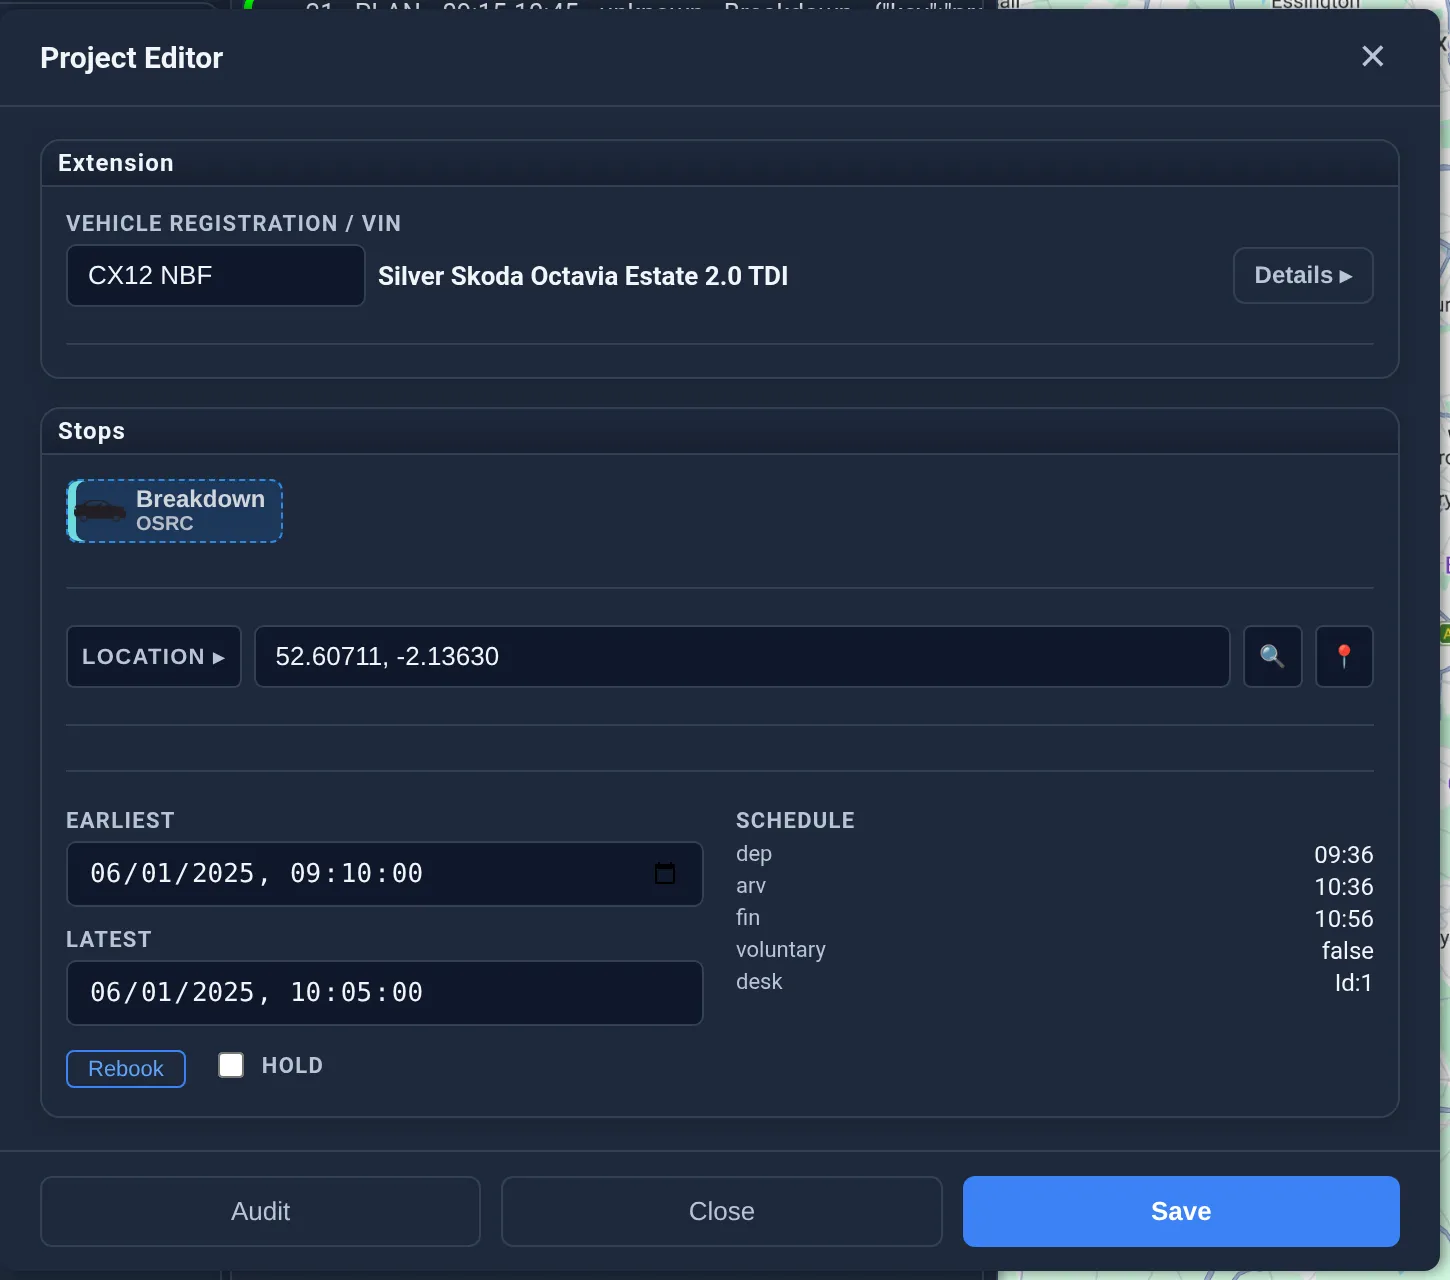
Section titled “Projects and stops”The work itself. A project is one job — a breakdown, a booked appointment, an inspection — made up of one or more stops (the places a resource has to be). The first stop is the master stop; a job may add further stops (for example recover then unload). Projects appear in the work list.
Response points are a second list of stops for fixed or recurring service points, handled the same way but kept separate from one-off project work.
The plan window
Section titled “The plan window”Select a stop or a resource and the plan window shows that resource’s schedule — the ordered chain of stops it will work, with times. The map draws the same chain as a line. This is “the plan” for that resource: read it to see what Spiral intends, then adjust from here if you need to.
Actions
Section titled “Actions”The Actions panel is the operation’s to-do list: things a person needs to judge, ranked by urgency with the hottest at the top — checks the system has raised, messages from the field to acknowledge, questions to resolve. Clicking one opens the relevant job’s editor with the action presented, so every decision is made in the context of the plan it changes. Two-way messaging between dispatch and the field rides the same queue. The full story — what raises them, who sees them, how they conclude — is the Actions guide.
Operational warnings Spiral raises about the current schedule — for example why a particular job cannot currently be allocated — are presented as a notice to acknowledge. If the optimiser itself hits a fault (rather than merely declining a placement), the failure is surfaced directly in the top bar instead of being swallowed — you see that the schedule has stopped advancing and why, rather than a silently frozen screen.
Stop states
Section titled “Stop states”Every stop moves through a lifecycle as the day progresses. The common states, in order:
- PLAN — planned by Spiral, not yet acted on.
- DPLY — deployed: offered or sent to the resource.
- HEAD — heading: the resource is travelling to the stop.
- CMTD — committed: locked in — the resource is on its way and won’t be diverted.
- ARVD — arrived: the resource is on site.
- DONE — finished.
(Other states — INIT, OSRC — cover initialisation and sourcing/offer steps. CALL is special: it appears only on a standby resource’s roster stop, and means Spiral is calling that resource out.)
The label you see is often translated by your domain into your own language — for example an UNLOAD
stop may show “RECY” rather than HEAD. The colour of a stop reflects its state and how far ahead
of or behind schedule it is.
The map
Section titled “The map”The map shows the geography of the operation. It deliberately does not show every stop at once — it shows what is relevant right now:
- the plan of the selected resource or stop (the line and its stops);
- the project stops of any watched/active desk — including unallocated work that has no resource yet;
- the children of a stop that is in the plan; and
- anything that shares the current selection.
Each marker carries a letter (its line letter) and a colour (its state and delay); the line drawn into a stop takes that stop’s own colour. Stops with no fixed location (“anywhere”) aren’t drawn.
The zoomed-out heat map
Section titled “The zoomed-out heat map”Zooming out far enough that individual icons would crowd the view (roughly 350 in sight) switches the map to a heat-map presentation: the icons give way to translucent areas showing, at a glance,
- red — where work delays are building (stops whose arrival is beyond their latest time),
- purple — where unresourced work is waiting for action, and
- blue — where idle resources are over-supplied.
A red area sitting over a blue one is the picture worth investigating — late work alongside idle
resource. The map is passive in this mode (no icons to click; a small legend appears bottom-left);
zoom back in and the icons return. Zooming is never restricted. The colours and area size are
domain-configurable via the application-level
helix.heatmap block.
A typical workflow
Section titled “A typical workflow”- Watch the desks you are responsible for — their work and resources appear.
- Scan the work list and the map for waiting or late jobs.
- Select a job or resource to open its plan and see what Spiral intends.
- Adjust if needed — reassign, lock or rebook — and let Spiral re-optimise.
- As resources deploy and arrive, watch the states and colours update live.